My birthday is coming up next week. My inlaws always send us a birthday present inthe form of a check. I have such a problem. I cannot decide if I want the bendable bright light or a bicycle!
Here are the pros and cons...
Bendable bright light
Pro
It's waaay smaller than the huge hunky Ott light I have now
The amount of heat it gives off has to be smaller than the huge hunky Ott light
The huge hunky and might I add expensive Ott light is made with plastic knobs and screws that don't have heads. The knob is stripped and the screw is not tightenable. The riffin raffin thing will not stay put. I put it in place and it wings out in another direction. Sometimes, I have to lean it on my forehead as I sew in order to get the light in the right place.
Cons
I already have a perfectly usable light in the huge hunky Ott light. A bit inconvenient but usable and not propped on my forehead most of the time!
Bike
Pros
Mrs. S. got a bike and I'd have someone to bike with
The gym is less than 2 miles from here. I would bike there
I need to exercise. If I get any fatter, I'll bust!
Cons
Yeah right! The thrill will last 10 mins.
I have to store it.
Mrs. S's thrill will last 10 mins.
I'll complain about the heat and drive the gas guzzling car the 2 miles to the gym
Whatcha think?????????Bike or light! AHH!
Friday, May 30, 2008
Wednesday, May 28, 2008
Done & out the door!
Finally! I finished this quilt a while ago but hadn't tacked down the two sides of the label and mended the hole I put in it when quilting.


I did that yesterday, washed it and it's was slept under last night! Good thing Mrs. S & Mr. Fancypants didn't decide to call it quits after one year of marriage as this is 7 months late!


As a late payment, I made them pillowcases...yet another project that I've been wanting to do for years but just haven't tackled. Why I have no idea as I made one before I left for work yesterday morning!

Monday, May 26, 2008
Stashbusting
I've been thinking alot about stashbusting. You see, I buy fabric here and there. No, I'm not buying willy nilly or without a plan. I bought the Kona Cotton I am using in the Quilt for an Hour project. I bought a half a yard of novelty fabric for a project for my daughter. I was feeling guilty. I mean the point to stashbusting is to use what we have. But then I began to think about what stash is to me. Yes, I have alot of fabric. But I have tons and tons of books, patterns, magazines, ideas in my head....This is stash too. I find all the things that I want to do as overwhelming as the loads of fabric. But let me tell you. I've begun to do some of the things that I have wanted to do for years. This year I have finished UFO's,made purses, wallets, totes, grocery bags and pillow cases. I made coasters and baskets. I made a silly little zipper bag for Ms. A's friend. Do you have any idea how long I've wanted to make coasters? Or pillowcases? Or the zipper bag? Forever! Why didn't I do it before? I always have a quilt hanging over my head. Something that needs finished. Well, I still have a few UFO's but anything I start new, I finish. Once I finish something big, I give myself permission to start and finish something little. I also am just plain working on all those little things that have been floating around in my head. It feels great and I feel pounds lighter. I don't feel nearly as overwhelmed when I walk in my sewing room because I am accomplishing something. I feel fantastic about it. So I've added to my fabric stash. I'll get over it. I have actually USED the things that I have here! Accomplished long standing goals! That is stashbusting too! Look for pictures soon!
Sunday, May 25, 2008
Whew!

I finally finished all 24 blocks. It was almost painful, LOL, but here they are. I've learned that
a)the seam ripper is my friend
b)no one ever died from ripping more than sewing
c) a deadline forces me to finish when I'm irritated
and
d) all kidding aside, I can make a block the right size and yet some of my points will need to be sacrificed when I assemble the blocks because there is not a good 1/4". Why? This has me stumped. Everything measures correct. It's interesting though. I never checked the 1/4", at the points, when measuring. I only checked that the blocks were the correct size. Interesting.
I'm not going to fret too much. The world will not come to a crashing end if my points are not perfect. I'm already agonizing over how to quilt this. ......
I'm on a roll...
OF MISTAKES that is! Scroll down to the picture of the blocks. See the problem? BIG BIG BIG SIGH!!
Saturday, May 24, 2008
Perfection is a pain in the *^*&^%%
BIG SIGH! I swear, I come back to what I said yesterday, I AM A DINGBAT!! I am plugging away at this QFAH project. I am finally to the point to assemble blocks and I discovered this

and this
 I have 6 nearly perfect blocks. Taking my time and working methodically may not always work well for me, but it is worth having the blocks come out so close to the correct size that I call them perfect!
I'm just too tired of my perfecting my ripping skills!!LOL!

and this

Do you see the shadow half square? No amount of turning will correct this. The only thing that works is ripping! Oh , my Grandma Bosh is waggling her finger at me right now and saying in her high pitched voice "If you want to sew you have to learn to rip." I don't mind the ripping but must I do things wrong so frequently to get so much practice? (I've been doing an equal amount of sewing and ripping this evening). Oh and notice the pile of blocks under the aqua? They are all wrong also. On the positive side there are only about six. On the negative side, the entire assembly must be ripped and not just one side. SIGH, SIGH, SIGH!
However, if I want to look at the full side of the glass instead of the empty ......this is what I HAVE accomplished!
 I have 6 nearly perfect blocks. Taking my time and working methodically may not always work well for me, but it is worth having the blocks come out so close to the correct size that I call them perfect!
I'm just too tired of my perfecting my ripping skills!!LOL!
Friday, May 23, 2008
QFAH

I'm plugging away here on my Quilt for an Hour project. uhhhhmmmm.....sorta. I got sidetracked by the last Gray's Anatomy and kinda sat for two hours and pretended to sew but here is where I am at. I have one row assembled on all 48 blocks.
I am a dingbat! A total and complete dingbat! When I began this project, I knew that I had to be very careful as my shadow fabric was severly limited. Yesterday I posted the picture on how much fabric I had left. Today I realized that I was three 4 1/2" sq. short. Now yesterday I also realized that I had miscounted my star points and needed to make one additional. When I cut the shadow fabric for the center of the points, thinking I had plenty of 4 1/2" sqs, I just cut with the fabric folded. It didn't matter that I ended up with 3 too many centers. I had over cut star points and thought I'd make a few very scrappy. But today, AAH ! Now I needed that fabric and had absolutely none left. NONE! Totally ticked off I went to Joanns. It seems that the shadow fabric is NOT a Kona. What is it? Who knows? It may have been in my stash for years! Off to Hancocks. Nothing there. UGH! I found a reasonable replacement but I only needed 3 squares. This quilt is NOT scrappy and three off color.....UGH!! UGH!!! (while I was at Hancocks I found a 70% off sale on zippers....I bought uhmm, just a few) Back home I flopped down on the couch and pouted. I explain to DH my dilemma. He sympathized like most men. Mmhmmm he said. Back to the sewing room. Wait, I had a scrap pile! Here it is !! Yeah !!!! I ran triumphantly to the living room to show DH the two scraps of fabric that I sewed together to make blocks. I quickly attached them to the star points block. HEY WAIT! This isn't the same fabric!! It was some muslin! I had mistaken muslin for my fabric! By now I was so mad, irritated and annoyed that I was ready to chuck the whole thing in the trash. (but I didn't and you'll see why in a minute. This is going to end up being a long post) Suddenly I remembered that my scrap pile also contained some less than perfect shadow and background half square triangles that were less than perfect. PAYDIRT! I took them apart and sewed two together and viola'! a perfect 4 1/2" solid colored shadow block! What did this all yeild? A a special trip to Joanns and Hancock which cost me $20.00, plus the gasoline to get there + entire afternoon and part of the evening spent agonizing and being PU'd +sewing and ripping and ripping and ripping = 3 - 4 1/2" squares!
On the positive side! LOOKEE, LOOKEE, LOOKEE! Do you know what this is? It is a block that is only 1/16th off, the diagonal is in the right place and there is 1/4" left on all of the points. Do you know what that means?? It is PERFECT! I have never made a perfect block and after my tirade a few days ago I didn't think I ever would. But NOT using the June Tailor shapecut ruler, USING the Marti Michell templates, adjusting my needle and slowing my
machine down, WHOOHOOO a perfect or as near to perfect as I need, block!

Thursday, May 22, 2008
A finished luggage tag


AND NOT mine! Whoo hoo! I had sent the directions to Karen and lookie what she made! Beautiful! (I'm so excited that she was able to follow my directions!)
Quilt for an Hour
I have been agonizing, planning, sewing, sewing, sewing. It seems that Judy is waaayyy faster in her hours then I am in mine! I began on Sunday with cutting fabric. Monday I cut and sewed. I fell behind a bit. Tuesday, more cutting and sewing. Fell behind a bit more. Weds. NOTHING! Ahh! This is QFAH every day! I was behind on Tuesday and now......Yikes~!
I've been looking around at everyones's fabric choices and I am jealous. They are gorgeous!!!! I agonized over what to use. I finally decided that I wanted to make a quilt out of all solids. I am using Kona Cotton for this entire quilt. It will be interesting to see how it looks when finished. I also decided that I needed the quilt bigger and am making it from a 12" block instead of 9". I managed to talk myself out of making it king sized!
I am using Kona Cotton for this entire quilt. It will be interesting to see how it looks when finished. I also decided that I needed the quilt bigger and am making it from a 12" block instead of 9". I managed to talk myself out of making it king sized!I didn't pay attention to exactly how much fabric I had.....This is what I have leftover from the shadow color....
No room for error here. I'm holding my breath that my taking care in sewing, using the Marti Michell templates and general praying, will keep my blocks true to size.
Here is what I have totally finished. Hopefully the points will be done tonight.

Friday, May 16, 2008
The case of the inaccurate quilter
I love my hobby. I'm just not very good at it. Oh, I produce nice things. They look good in photos, the recipients really like them and I generally enjoy creating. It's just that this hobby is all about math and accuracy. These are two very difficult concepts for a fly by the seat of your pants kinda girl. Math.....all I can say is thank G-d for calculators and those of you that figure things out for us numberly challenged.
Accuracy, this, THIS is my downfall. I used to think that equipment had alot to do with it. After all, using the correct tool for the job goes a long way to a better product. It's just that there are soooo mannnyyy tools out there to do the same thing.
I used to have a Kenmore machine. I loved it. It didn't hold the tension nicely for machine quilting and "it pulled to the left" when sewing a seam. I didn't get an accurate 1/4". Hmm....perhaps a new machine will help that. Enter the Janome 6600.
Half square triangles. I've tried making squares, sewing down either side of center, then trimming to get perfect 1/2 sq. triangles. Effective but time consuming to draw the line and then re- trim. Enter the Angler....Works well but a PITA as every bobbin change requires you to move it. Draw a line on the bed of the machine to achieve the same effect.....AHhh, so, so. Cut half square triangles...both to size and larger to trim down. Hmmm...time consuming to touch the same piece over and over and over. Buy corner trimmers so that those silly dog ears don't disappear in the machine.... All of this leads to frustration and quilts with squares & rectangles.....gets boring.
Now I want to work on Judy's quilt for an hour project. Yikes! 54-40 or fight, Peaky & Spike, whatever you want to call them, these little blocks are buggers to get accurate and they MUST be accurate. She suggest, to use the tri-recs tool...Hey, I have that. It's unopened but I have it. Let's pop that baby open and create perfect blocks. Everyone else raves about it. Surely I can do this too. After all, I have the tools, the machine, the fancy thread......I try one block. It's supposed to finish at 3 1/2". NOT! It's 3 1/4" This is not accuracy. Sigh, re-realize the first line of this story, "I'm not very good at this," and try again. Enter the Marti Michell templates.
Yeah, we had a demo at our guild meeting just at the right time and I bought them. Then I went to the LQS and bought more. Finally, I, yes I will have an accurate method of making half squares, Peaky & Spike, ect. All the corners are trimmed at the same time you cut the blocks. The possibilities are endless. Sounds good to me. My mind reels with the possibilities. Agonize over fabric choices. Buy more fabric. Agonize some more, and buy more fabric. It defeats the purpose of stashbusting but I am so excited because I am going to make perfect blocks. I have the perfect tool now and I deserve new fabric. (Hey, just so it's clear here, I'm not knocking or endorsing tools or the methods others use. I just want them to work as well for me!)
insert a very long, defeated sighing sound.................................................... My blocks are not perfect. I made one full sized block with the MM templates and one with the tri-recs. The MM is MOST accurate. The entire block is only off by a scant 1/4". and the center diagonal is very close to perfect. The tri-recs (second attempt I might add) is off by a full 1/4" and I didn't even bother to assemble the full block as my P & S blocks are off by that 1/4".
This is so absolutely frustrating. OBVIOUSLY, It's not about the perfect tools. OBVIOUSLY, I am the problem. I just want to find the method that works for me. Why is it so riffin' raffin' hard. I cannot figure out what it is that I do wrong...consistently I might add, that creates that lousy 1/4" discrepancy. I really think it's a bit from column A and a bit from column B....a bit my cutting, template/ruler placement, where I sit in relationship to the machine, a thread off here and a thread off there but.......It is so discouraging. I am tired of spending money and storing things that ....well, quite honestly don't seem to help me.
Where does this little rant lead me? Nowhere. I'm still going to go back in and slog my way through this quilt. (I'm going to use the templates and try moving my needle one notch or two) I'll try another project next week and the week after that. But when a new tool shows up promising to make me a better quilter.....well, who knows. Maybe I'll just sigh and keep my checkbook in my pocket.
Tuesday, May 13, 2008
oooopppps
Had to post and repost and repost to get the printing to look right on the luggage tag. If it looks wonky you may want to actually click on my blog to see it rather than looking through bloglines ect......
LUGGAGE TAG TUTORIAL
After much agony and with great trepidation, I am posting the directions for my luggage tags. Thsi pattern is totally my creation. I had the basic pattern but it didn't close, didn't fold and wasn't private. That said, this is my baby so go lightly on me if there are any confusing portions. Hopefully not. Plus, I would appreciate simple credit if you use this for a guild project or any other project. (Boy, I am confident!) Feel free to contact me with the positive and negative....I can take it! LOL! I have enjoyed many, many of patterns, tips and tutorials courtesy of blogland. This is my little thank you. Enjoy !
If you make a tag, drop me a note and a picture and I'll add a link to show it off for you!!!
Luggage Tag
These tags are great for more than just luggage. Attach to backpacks, sewing machine cases or sewing toolboxes. I have one on each item I take to retreat. We all have rolling toolboxes…mine is the only one with the “naked cowboy” luggage tag!!!!! My nephew attached his baseball tag to his backpack for school! DH has one football tag and one comic strip fabric tag. They are so much fun to make!

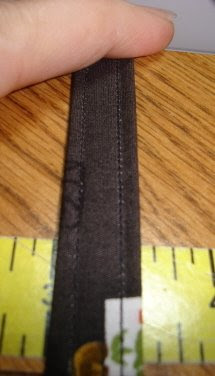
* It is nearly impossible to attach the plastic with out a “Teflon” or non-stick foot. Do yourself a favor and invest the couple of dollars it costs for this foot. You will NOT regret the purchase and as an added benefit your family will not be subject to your creative vocabulary while trying to use a regular foot on plastic!

Place the plastic 1 ½” down from the short side, and centered between the fold and edge of tag. (You don’t want to catch the plastic in the seams later on.) See the picture below? IT IS WRONG! YOU MUST HAVE THE TAG OPEN AND FLAT WHEN YOU ATTACH THE PLASTIC PROTECTOR!

If you make a tag, drop me a note and a picture and I'll add a link to show it off for you!!!
Luggage Tag
These tags are great for more than just luggage. Attach to backpacks, sewing machine cases or sewing toolboxes. I have one on each item I take to retreat. We all have rolling toolboxes…mine is the only one with the “naked cowboy” luggage tag!!!!! My nephew attached his baseball tag to his backpack for school! DH has one football tag and one comic strip fabric tag. They are so much fun to make!

• Fabric at least 7.5”X 12.5”
• Matching fabric cut 12” X 2 ½” for strap
• Fusible interfacing the same size – I used DecorBond. You can use any type of heavier interfacing/craft interfacing. You want this to have a bit of body.
• Clear plastic/vinyl – I bought mine at Joann’s. It is on the long rolls with the plastic tablecloth and home dec fabric. It is the “blue writing on the backing paper” weight.
• Zipper foot
• Teflon (nonstick) foot for your machine. This is a lifesaver!!!
Make a Pattern
With the pattern material of your choice, (I used a mailing envelope. You can use a manila folder, a piece of cardstock….anything that is long enough to cut to the right shape. It isn’t necessary to be durable), measure a rectangle that is 12”X 3.5”. Cut it out. (For accuracy, I used a rotary cutter and ruler to cut out my pattern). Mark the center on one of the short ends. Then, working from the same end, measure and mark 1 ½” down on both sides. Create the angle of the luggage tag by drawing a line from the center dot to each of the marks along the side. (my picture is for demonstration only. The actual pattern is not the same color) Cut on the line to create the angle of the pattern. (Again make sure this is accurate as it is you pattern. )
Cut the Fabric and Interfacing
Fold the fabric in half to measure 3.5”X 12.5”. (I was fussy cutting my fabric so my photos show a much bigger piece of fabric. I have the pattern lying along the fold. That is extra fabric at that the top) Lay the pattern on the fabric with one long edge along the fold.
Cut the fabric.
*I used a rotary blade and ruler to make nice clean cuts. Lay the ruler on top of the pattern and cut along the edge. Repeat on all sides. If you have trouble with the pattern slipping, put a piece of tape under it to hold it to the fabric.
* Because I was fussy cutting, I made a see thru template. The rest of the cutting photos will use the see through template.
*Don’t mind the blue tape on the edge…it is so you see the template. Also, the ruler is only being for cutting, not to measure.
When you open the fabric it will look odd!
Blunt the tip of the point by measuring in ¼” and cutting it off. (I noticed that I didn't blunt the tips in this picture...or the next.....BLUNT the tip even if I did do it out of order!)
Cut 2 separate pieces of interfacing. DO NOT cut on the fold. You need these to be separate so that the tag folds nicely. Cut the interfacing with a separate pattern down ¼” 4 sides. Cut down the 3 sides shown plus the shorter side (The picture does not show the ¼” cut off the shorter side). There is no need to cut the second long side (in this case, the picture is right!)

Fuse the interfacing to the wrong side of the fabric. Use the picture to help with placement. As you can see, I wing it with trimming the interfacing. It isn’t perfect!
This odd shaped piece will be folded in half to be finished. Before we continue, you need to choose which half you will finish to the inside of the tag and which will be the outside. The outside of the tag is what people see while the inside will hold your label.
Adding the vinyl label holder
Cut your piece of vinyl/plastic to measure 4 ½” X 2 ½”
We will be working the portion of fabric that finishes to the inside for this step…... NOT the inside of the tag as in the interfacing side but the side of the fabric that will finish TO the inside. In this picture I have folded the tag to make sure that I will be adding the plastic label protector to the correct side. You are looking at the outside of the tag….The label will be inside…where the woman’s head is!

* It is nearly impossible to attach the plastic with out a “Teflon” or non-stick foot. Do yourself a favor and invest the couple of dollars it costs for this foot. You will NOT regret the purchase and as an added benefit your family will not be subject to your creative vocabulary while trying to use a regular foot on plastic!
Place the plastic 1 ½” down from the short side, and centered between the fold and edge of tag. (You don’t want to catch the plastic in the seams later on.) See the picture below? IT IS WRONG! YOU MUST HAVE THE TAG OPEN AND FLAT WHEN YOU ATTACH THE PLASTIC PROTECTOR!

I use a piece of blue painters tape to hold the plastic in place while sewing. Using a short, small zig zag, sew three sides…the short side closest to the edge and both long sides. (if you would like you can hand or machine embroider your information and lay it under the plastic before stitching. If you do this, you can stitch down all 4 sides of the plastic and enclose the information.) Be sure to backstitch at the beginning and the end. Sew very close to the edge of the plastic. See the picture below? IT IS WRONG! YOU MUST HAVE THE TAG OPEN AND FLAT WHEN YOU ATTACH THE PLASTIC PROTECTOR!
Can you tell I had to rip apart my example!?!?!
Make the strap
Press the strap fabric in half lengthwise. Open it up and using the center press mark as your guide, fold in both sides to meet the center. Press and then fold in half along the original press line.
Switch to your zipper foot. First sew the strap along the open edged. Then sew the other side. It just looks better.

Attach the Strap
Fold the luggage tag, right sides together, along the fold where the two pieces of interfacing meet. Pin the strap on the inside, along the blunt tip with the edge of the strap at the edge of the tip.
Match the sides and pin. Using a ¼” seam, sew around all the sides making sure to leave an opening to turn the tag. When sewing the blunt tip end, be sure to pivot and keep the tip squared off. Also, I always go back and forth when crossing the strap to reinforce the stitching. (That is, I go across the short area where the strap is, backstitch back across and then go forward again and continue on with my seaming)
Trim the corners and turn the tag right side out. I use a chop stick to poke out the corners.
*You see where I have the opening for turning? I find it works best there and it is where I always place it.
Tuck in the unfinished edges where you turned the tag. Press. DO NOT PRESS OVER THE VINYL/PLASTIC!
Using the zipper foot and working close to the edge, top stitch all sides.
Making the closure
Along the short end, mark a line 1” down and approximately ½” in on each side. Following your machines’ directions, make a button hole (YES! A buttonhole!) along this line. My machine has a buttonhole foot along with the settings for an automatic buttonhole or a manual buttonhole. I needed to use the manual setting. (Don’t be scared off here because of the buttonhole. You just need to have a finished opening to close the tag. It doesn't need to be perfect or beautiful! I always have trouble with my buttonhole but end up with a reasonably good looking opening. )
Use your seam ripper and open the very large buttonhole! At this point take a few minutes to trim the edges of the buttonhole. I always use a marker to color the edges where the interfacing shows.
Write your information on a piece of paper and insert it in the plastic ………and ….
………………..Insert the strap into the buttonhole ………………………..
…..VIOLA’! You have a luggage tag ready for vacation!
Monday, May 12, 2008
What I didn't post on Saturday
........................................................................... Left foot...................
 ................... Right foot.......
"Nuff said! Luckily I seem to be healing quickly, it's not broken and seemly not as sprained as I'd thought. Inconvenient yes! Embarrassing Yes! But healing nonetheless. I couldn't let DH be the only one getting pity this week now could I?
 Left foot...................
 ................... Right foot.......
"Nuff said! Luckily I seem to be healing quickly, it's not broken and seemly not as sprained as I'd thought. Inconvenient yes! Embarrassing Yes! But healing nonetheless. I couldn't let DH be the only one getting pity this week now could I?
Sunday, May 11, 2008
Stashbusting aka "de-UFOing"
I am so thrilled and getting in JUST under the wire. I met my weekly goal! WHOO HOOO! I bound both quilts that needed binding. I finally, finally finished Mrs. S's anniversary quilt. Because I just finished it a few minutes ago, there are no pictures. You;ll just need to check back. I do however have photos of a lap quilt that has been a UFO for ....oh.....2, maybe 3 years.
Sometime, at least 3-4 years ago, a few friends and I went to Laredo to these fabric stores that sold seconds for about $1/yd and scraps, or should I say chunks, by the pound. They had a bin at least 10 feet long mounded with chunks of fabric. Needless to say we bought oodles and oodles of fabric. We fell in love with this Mary Engelbreight fabric. We all bought a bit but I bought a ton! The next time I went back, I bought even more. I finally finished up the last of it...well, not quite true, I threw away the leftover scraps because I couldn't' stand to look at it anymore. I made 4 Yellow Brick Road lap quilts (Atkinson Designs) both front and back from the fabric. (Oh and binding on all but one) YBR lap quilts are very big. The yardage on the package is 8 yards per quilt including backing and binding. So let's figure 8 yards X 4 quilts.....that was 32 yards of the same fabric that I had and used! No wonder I threw away the scraps!!! I WAS SICK OF LOOKING AT IT! (not only that, it wasn't the highest quality to begin with)
I'm showing two of the ME quilts I have left. The one has been finished for 2 years waiting for the other to be completed. (More on that one later in the week)

This is the one that has been in the closet for 2 years....The front and .......
......the back. We also bought these panels. I used them in the backings

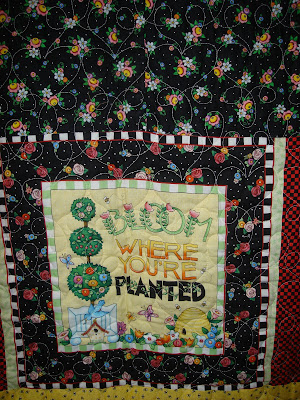
Here is a closeup of the back panel

This is the one I just finished. I was finally out of fabric so I used the bits and pieces for the backing. I also used up all the panels I had left. I had to use Kona Cotton for the binding! I was thrilled! You have no idea how sick I am of these quilts. They have been over my head for years now and not only are all of the quilts finished, all of the fabric is gone!
A BIG SIGH OF RELIEF!

I did forget to log a few purchases here and there but my totals to date, although in the positive instead of the negative make me happy. Not only have I used up fabric, I've completed 7 UFO's with 3 of them being lap to queen personal quilts and 2 lap sized charity quilts. I have bought 99 yards of fabric and used 65 for a gain of 34yards. I'm not sad, mad or worried. I'm thrilled!!!!! 7 UFO's out the door. I bought 1 fat quarter this week but used a gift certificate to do so. No biggie!
Thursday, May 08, 2008
A week is just a week....& yet.....
This has been a long week. One of our Mah Jongg ladies mom died. She was 98, lived independent, played bridge, volunteered and generally was active. She went downhill in about 1 1/2 weeks. So sad. But on the positive side....My friend is in her 60's. Imagine having lived your entire life with your mom by your side. How fortunate! What an incredible gift she had for nearly her entire life.
I was supposed to have some tests done on Friday but have postponed them. DH came home from the doctor and said that he had to have a test next week. On the scale of "uhhoh, this may be a biggy," DH's test trumps mine so I've postponed for a bit. {{{sigh, sigh}}} If only our bodies could get older without aging! Now there's logic for ya'.
...and on a totally unrelated note......what is it about DH that causes him to completely ignore my daily reminders to buy his mom a Mother's Day card...and mail it. So, last night with the dramatic palm crashing against his forehead he proclaims, "Darn! I forgot to get a card!"Well DUH! As at Passover, Mah Nishtana! Why is today any different?! Or in this case, why is this years Mothers Day any different? (I shoulda just cut out the middle man and done it myself last week!! ) So this morning, THIS MORNING he says to ME,
"uhhhh, you are going to order my mom flowers today right." HMPH! Is she my mom? I think not! Love her? Yes. Respect her, ect. ect..? Yes. But not my mom! There are a few things I draw the line at. One is ,although she is my MIL and I love her and all, she is DH's mom and this is the one time of the year he needs to do the legwork. The other is I do not send my dad's wife a moms day card ....she is not my mom either! So, in addition to whatever else is going on today, I now have the job to remember to order flowers, it's become my responsibility. ....uhmm... again! If he'd have just asked me earlier in the week it would have already been done. But no, he had to pretend that he was going to actually do this this year......sigh and LOL! Like I really and truly expected anything different!.........it's a good thing I'm feeling sorry for him being worried about his test next week or I'd have a few things to say!
Monday, May 05, 2008
State of our Backsides.....
Man! I really have to come clean here...The state of my backside is dismal! I've been exercising...Oh yeah I've been exercising. My family is having a 120 mile challenge. It runs from April 1 - June 21. My sister, sister-in-law and I are neck & neck. I've gone 49 miles since beginning. On that front, I'm very pleased. On the weight gain, keep my mouth shut, don't eat the junk.....well.....I've been lying and have to come clean. I changed my challenge ticker to reflect the weight I've gained. It has been a struggle since December in the food department. A terrible struggle.

If I'm not careful, I'll end up looking like tweedle dee and tweedle dum here! Send strong thoughts in my direction please....my "skinny pants" depend on it! (what I really want to know is how they found a bikini to fit!!!)

If I'm not careful, I'll end up looking like tweedle dee and tweedle dum here! Send strong thoughts in my direction please....my "skinny pants" depend on it! (what I really want to know is how they found a bikini to fit!!!)
Sunday, May 04, 2008
Stashbusting
I finished:
6 grocery bags at 1 yd each
3 sets of coasters at 1.25 yds
two coil baskets at 1/2 yd! (I only have one pictured)
I bought nothing. I am not only pleased but amazed.
Next week.......... be prepared, I will have my two quilts bound and finally be able to claim the yardage!!
6 grocery bags at 1 yd each
3 sets of coasters at 1.25 yds
two coil baskets at 1/2 yd! (I only have one pictured)
I bought nothing. I am not only pleased but amazed.
Next week.......... be prepared, I will have my two quilts bound and finally be able to claim the yardage!!
What are you?
Ms. CalicoCat wanted to know what realization we've come to lately. Funny because I've been formulating this thought all week. I've decided that there are two types of quilters....those that are crafters who quilt and those whos craft is quilting. The difference? I am a crafter that quilts. From time to time I get bored with making "big blankets." I have tons of quilt books and patterns and enjoy dreaming about the bazzilions of king sized quilts I'm going to make, but the reality is, that "ain't" ever gonna happen. I don't do too bad in the making quilts department but honestly I will never create all that I'd like. It takes so long (I'll never understand how some of you pop out these tops so quickly!!! Like OZ, things happen so quickly around here!) and I am a slowpoke! Like I said, I get bored, bogged down and then shut down. That is when you'll see the crafter in me reappear. Like now. I'm having a blast making napkins, fabric coiled bowls, coasters...crafts, fabric crafts, but crafts nonetheless. Even table runners seem "too big" for me right now. I am also in the "geterdone" mood and mode. Soon, I'll feel the need to make another quilt but right now I am perfectly content to craft.
My friend CCCat is a one who's craft is quilting. She makes quilts and only quilts. She makes big, gorgeous, well planned and thought out, impeccably quilted and finished, quilts. As much as I don't get not making crafts, she doesn't really get making these "little projects." She is also one of you "popper outers" that think about a top and poof! it's finished. It amazes me. I'm still cutting fabric and she has a finished top. Another one of my friends told me that making three dimensional items gives her (I paraphrase here) the heebeejeebees. She also is one who's craft is quilting.
I notice in blogland that there are equal numbers of each. Many of us do embroidery. Many knit, crochet, paint, dye fabric...But many of us are out there just making quilts. Interesting, just plum interesting. It doesn't save the world or lower gas prices, it just is an interesting little observation I've been watching.
So what are you? Are you a crafter that quilts or one who's craft is quilting???
Saturday, May 03, 2008
Goals for May
I HIT THE WRONG BUTTON AND I PUBLISHED TOO SOON!!!!
I didn't do too badly on my April goals. I nearly choked from laughter when I reread the ""feed and fertilize." Uhmmm, I meant my yard!
QUILTING
1. Bind 3 charity quilts
2. Bind ME quilt
3. Veronica bag for DD's
4.make grocery bags from old ugly fabrics
5.make apron for a dear friend
6.make napkins for Passover
HOME
7. get my flower beds weeded and mulched
8. feed and fertilize
9.ready house for Passover
10.DO MY TAXES!
So... without further ado.....like anyone in blogland really cares about this...
Goals for May
Quilting
1. bind ME quilt
2. bind anniversary quilt
3. Veronica bags
4. one more UFO to flimsy stage
Home
1. flower beds....again!
2. choose paint color for bedroom
3. keep up with housework YUK!
4. keep up with mail
School
1. End of year books
2. Kinder gifts
3. Camp Curriculum - who is the dingbat that agreed to do camp this year!
Personal
1. exercise 4X/week
2. lose this weight I seem to be gaining
3. get back on track!!!!
4. manage time more effieciently....not so much goofing off. More time on the above!
I posted this mostly for me. Sometimes I need to make myself accountable....to myself. Thanks for indulging me in this drivel!
I didn't do too badly on my April goals. I nearly choked from laughter when I reread the ""feed and fertilize." Uhmmm, I meant my yard!
QUILTING
1.
2. Bind ME quilt
3. Veronica bag for DD's
4.
5.
6.
HOME
7. get my flower beds weeded and mulched
8. feed and fertilize
9.
10.
So... without further ado.....like anyone in blogland really cares about this...
Goals for May
Quilting
1. bind ME quilt
2. bind anniversary quilt
3. Veronica bags
4. one more UFO to flimsy stage
Home
1. flower beds....again!
2. choose paint color for bedroom
3. keep up with housework YUK!
4. keep up with mail
School
1. End of year books
2. Kinder gifts
3. Camp Curriculum - who is the dingbat that agreed to do camp this year!
Personal
1. exercise 4X/week
2. lose this weight I seem to be gaining
3. get back on track!!!!
4. manage time more effieciently....not so much goofing off. More time on the above!
I posted this mostly for me. Sometimes I need to make myself accountable....to myself. Thanks for indulging me in this drivel!
Friday, May 02, 2008
What Fun!
I am weird. My girls tell me this all the time. I know I am weird. I have self imposed limits on things, can't do this before that , ect. I have wanted to make the fabric coil bowls for a while now. I needed to finish the bags I started-check, finish the coasters-check, quilt the anniversary quilt and ME quilts,- check and check. Now the last two aren't finished but I felt like if I didn't get to do something new, I'd bust so.....
TAADAAA!


 It looks a bit wonky in this picture but it's not really.
I was so jealous of Jen at Cre8tiveQuilter for making her bowls. I am so glad I set aside a few of my weird rules to do this. It is fun! I can see how it would be addictive! I finised one small one and am already on another. The one in these pictures didn't use clothesline per se. I had a bunch of thick cording that has been sitting around here. Worked great. I like it much better than the very thin poly/cotton clothesline I am using now. Once I finish this I will go check out some clotheslines at the grocery and WalMart. I had this and couldn't wait to start another bowl.
Although I would have loved to buy the books, I just used this tutorial and am going to try to change things up a bit. So worth a try....so addictive!
Thursday, May 01, 2008
The Answer & Finished Projects
The answer to my help question is ....I can't directly post my tutorial as it is way too large of a file. I can't email it because my server says it's too big. So, I am going to post it directly to blogger in two installments. I'll get there, I'll get there....
I made 6 one yard grocery bags! That's 6 yards out the door! The pattern is a free one from Lazy Girl Designs. My girls, believe it or not, agreed to use these bags despite the ugly fabric! They said they would take as many bags as I want to make no matter WHAT fabric it is! WOW! I'm about to use up bunches of ugly, old calicos that I'll never use anywhere else.

There is more but I can't post it all in one post! I have to have something to say tomorrow!!!!
I made 6 one yard grocery bags! That's 6 yards out the door! The pattern is a free one from Lazy Girl Designs. My girls, believe it or not, agreed to use these bags despite the ugly fabric! They said they would take as many bags as I want to make no matter WHAT fabric it is! WOW! I'm about to use up bunches of ugly, old calicos that I'll never use anywhere else.
 On the minus side, if I know my girls, these bags will get lost in the trunk, under things and generally destroyed! Some things don't change no matter how old they get!
I used to be in a nickel exchange group on yahoo. I have badillions of 5" squares. I really don't like florals. So, I grabbed a bunch of florals and made sets of coasters. I used an old ironing board pad in place of batting. At 6 -5" squares per coaster I used up 72 squares! That is right around 1.25 yards! Plus the ironing board pad that I've had for years!!!
There is more but I can't post it all in one post! I have to have something to say tomorrow!!!!
Subscribe to:
Posts (Atom)
LinkWithin


